How to Change Your Default DNS to Google DNS to Speed Up Web Browsing?

How to Change Your Default DNS to Google DNS to Speed Up Web Browsing?
Sometimes you get very slow internet speed from your internet service provider; probably they do not have fastest DNS servers. To enhance your internet speed you may change your default DNS to Google DNS.
The Domain Name System (DNS) is a set of number that is used by your Internet service provider for naming PCs or devices connected to the World Wide Web. Basically DNS changes your domain name into an IP address needed to locate and identify your computer and devices connected to the network protocols. Domain Name System is one of the important components of the functionality on the Internet and provides a worldwide distributed directory service.
Here, we will provide you some easy and quick steps to change your DNS to Google DNS to get highest bandwidth limit and internet speed. If you don’t like the changes, you can always switch back to your Default DNS.
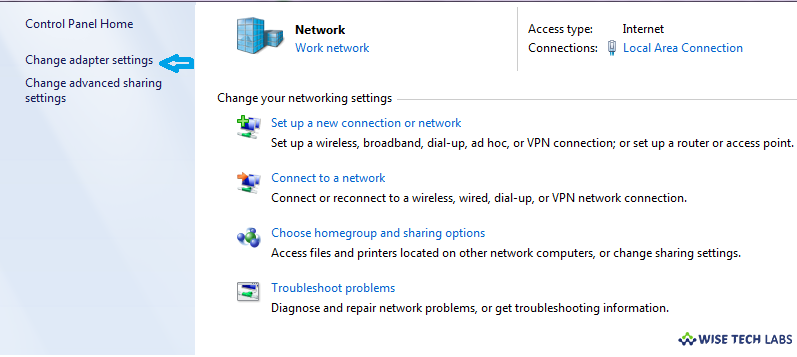
Step 1: First of all, right-click the network status icon in your system tray and then click “Open the Network and Sharing Center”.

Step 2: Now, click on “Change adapter settings”.

Step 3: Then, you will see all networks; select the network which you want to configure for Google DNS.
Step 4: Now right-click on Local Area Connection and select Properties.

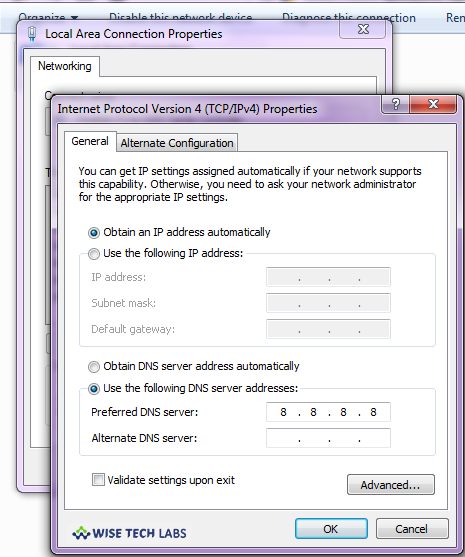
Step 5: The Local Area Connection Properties screen opens click to highlight “Internet Protocol Version 4 (TCP/IPv4) “and then click on properties option.

Step 6: Now select the option “Use the following DNS server addresses ” and replace the value of default IP with Google DNS value which is 8.8.8.8 OR 8.8.4.4 and then simply click on “OK” and restart your network.

Now, you are done with the Google DNS configuration and you can observe the internet speed. In case,you do not like the changes you may always switch back to default settings by selecting “Obtain DNS server address automatically”.


What other's say