How to fix screen flickering in your Windows 10 PC

Most of the Windows users updated their PC to Windows 10 successfully without facing any error while updating. However, updating your computer to a latest OS version is quite easy but sometimes it may cause some problems on in your PC because of outdated drivers and incompatible applications. After updating to Windows 10, many users are facing screen flickering issue. If you are one of them and want to fix this issue, you may easily do it by troubleshooting and updating outdated display drivers. Let’s learn how to do that.
To troubleshoot screen flickering on your PC
In order to figure out the reason that is causing flickering issue on your system screen. You may quickly do it by opening task manager. Follow the below given steps to do that.
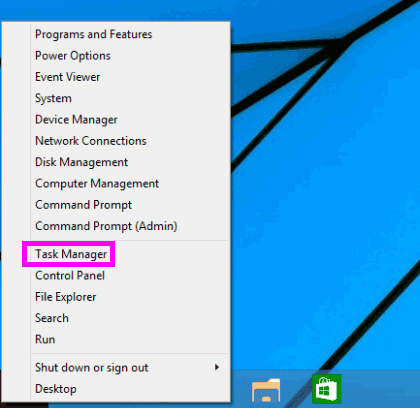
- To open “Task Manager” on your PC, press “Ctrl + Shift + Esc”keys on the keyboard at the same time. If that does not work, right-click in the Taskbar and select “Task Manager.”

- If Task Manager is not flickering that means any app is causing the issue.
- If Task Manager is flickering that means a display driver is causing the issue.
To uninstall incompatible applications
There are many application installed on your Windows 10 PC such as antivirus, games etc. Earlier the main reason of screen flickering was Norton AV, iCloud, and IDT Audio. You might be installed any application which is designed for the previous windows versions. In such a case, if you are sure about any application, locate that application to get it uninstalled. Follow the below given instructions to do that:
- On your Windows PC, open “Settings” and select “System.”
- Click “Apps & features.”
- Select the app causing the problem and click “Uninstall.”
- Confirm it by clicking “Uninstall” again and then reboot your system to fix the issue.
Moreover, you may also update app and contact the app manufacturer for an update will fix the problem.
To update display drivers on your PC
If Task manager is also flickering, you should update display drivers on your PC to fix the issue, follow the below given steps to do that:
- Start your PC in safe mode, then right-click the “Start” button and select “Device Manager.”
- Expand the “Display adapters.”
- Right-click the adapter and then click “Uninstall device.”

- Select the “Delete the driver software for this device” check box, then select “OK” and restart your PC.

- Once your PC is restarted, open settings by pressing the “Windows logo key +I” on your keyboard. If that doesn’t work, open settings from the start menu.
- From Settings, go to Update & security> Windows Update > Check for updates and then install the latest driver update.

By following the above given instructions, you may easily fix the issue. If the issue still persists visit your PC manufacture’s website, locate the “Support or Help desk” option to contact them and get your issue fixed.
Now read: How to unlock your PC if you forgot your Windows password


What other's say