How to access iCloud email using web browser

Apple offers iCloud Mail on iPhone that allows you to send, receive and manage emails easily. Once iCloud Mail is configured on your device, you may also access iCloud email on web browser using the Mail app on your device or Mac. Having iCloud Mail on you iPhone helps you to easily send, receive or manage emails and update emails from everywhere.
Most of us are not aware of that we can also access iCloud mail through web browser on Mac or PC. Additionally, the web-based version of the iCloud Mail also offers some amazing features to use. By using the web-based version of the iCloud Mail, you may take advantages of all the features from iCloud Mail. Let’s learn how to do that.
How to access iCloud Mail via web browser?
You may easily access iCloud Mail by following the below given steps:
- In order to do that, open www.icloud.com in any browser on your PC or Mac.
- Enter your “Apple ID” and “Password” to log into your account and then click “Mail.”
- After completing above given steps, you may access your iCloud email in browser and make other changes as per your convenience.
How to automatically forward your email?
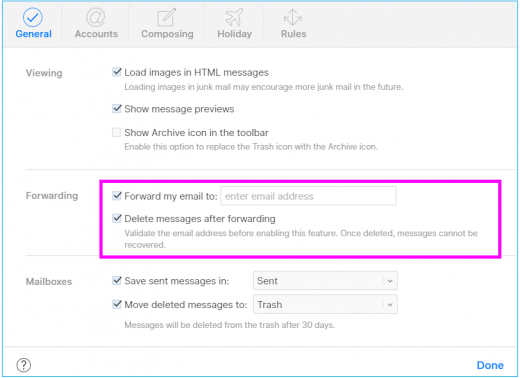
If you want to forward emails automatically, you may set up Mail preferences on your Mac, follow the below given steps to do that:
- Click on the “Action pop-up menu” and then select “Preferences…”
- Click“General”, in the “Forwarding” option check the box to “Forward my email” and then enter the email address on which you want to receive the email messages and click “Done.”

If you want you may free up space by deleting the message, once it get forwarded.
How to add alias in iCloud Mail?
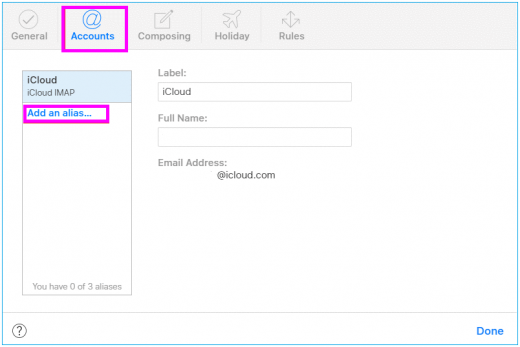
You don’t want to share your actual email address; you may set up a temporary email address to send emails without disclosing your email address. Follow the below given steps to do that:
- In the “Preferences” window, click “Accounts” and then click “Add an alias.”

- Enter the alias name with the other required information.
- After completing above steps, click “OK” and then click “Done.”
How to create vacation reply for Mail?
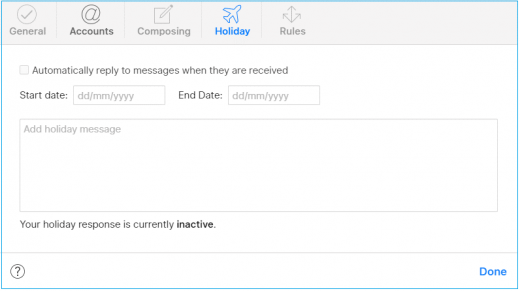
If you are going on vacation and want to set auto reply for emails that you receive while vacation, you may create vacation reply by following below given steps:
- In the “Preferences” window, click “Vacation.”
- Now, mark the box to “Automatically reply to messages when they are received.”

- After that, add the Start date, End date and a vacation message and click “Done” to save the changes.
How to add a mail rule?
If you want, you may create simple rules such as forward messages, mark them as read, and place them in a different folder from iCloud.com. Follow the below given steps to do that
- In the “Preferences” window, click “Rules” and then click “Add a rule.”
- Now, select a criteria for the message and an action to be performed and then click “Done.”
- Again, click on the “Done” to confirm.
This is how you may use iCloud Mail via any browser and take advantages of the features associated with it
Now read: How to secure your Apple ID with two-factor authentication


What other's say