What to do if webcam is not working on your Windows 10

In Windows 10 PC, if webcam or camera app is not opening and showing error that “We can’t find or can’t start your camera”, you may troubleshoot this issue by checking some settings on your system. Apart from that, Windows 10 has also a default setting or an option that can completely disable your webcam in all applications so make sure this setting is enabled. If you are using Windows 10 and facing webcam issue, here will provide you a list of instructions that may help you to fix this issue.
1. Check privacy settings on your PC
If you recently updated software on your Windows 10 PC, you need to permit apps to use the camera. As newer versions of Windows 10 don’t provide default access to apps so you need to allow them by following the below given steps:
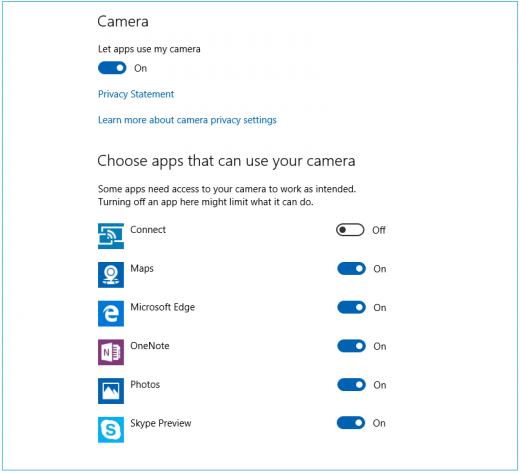
- In your Windows 10 PC, click on the “Start button” and then select Settings> Privacy > Camera.
- Enable “Allow apps to access your camera.”
- After allowing the camera access, under “Choose which apps can access your camera“, select the app which can access it.

2. Check the Antivirus software installed on your PC
- Open the Antivirus software installed on your Windows 10.
- Now, locate the settings related to blocking access or permission to use your webcam. To seek help, you may also visit antivirus software website.
3. Check for an outdated webcam driver on your PC
By following the below given steps, you check and update if any webcam driver is outdated on your PC.
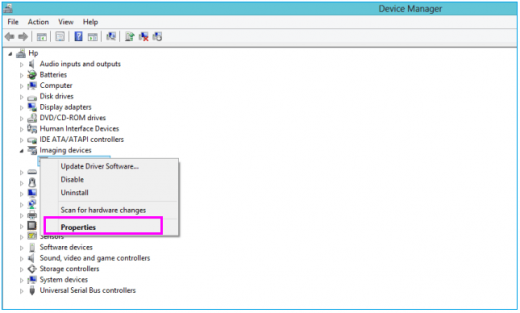
- On your Windows 10 PC, click on the “Start” button, type “Device Manager” and then select “Device Manager” from the search results.
- Under Imaging devices or Sound, video and game controllers, locate your webcam.
- Now, press and hold or right-click the name of your webcam and then select “Properties.”

- Switch to the “Driver”tab, select the “Driver Details” button and locate a file name that includes “stream.sys.” If the file is there, you need to replace your webcam with newer one.
- If file is not there, you need to update webcam drivers.
4. Rollback webcam drivers
If stream.sys file is not listed there, you need to update webcam drivers on your system.
- On your Windows 10 PC, click on the “Start” button, type “Device Manager” and then select “Device Manager” from the search results.
- In “Device Manager”, right-click your webcam and then select “Properties.”
- Switch to the “Driver” tab; select “Roll Back Driver” and then click “Yes.”
- After completing the rollback, restart your PC and then try to open “Camera app” again.
5. Uninstall your webcam driver and scan for hardware changes on your PC
If driver update is not available, uninstall your webcam driver and scan for hardware changes by following the below given steps:
- On your Windows 10 PC, click on the “Start” button, type “Device Manager” and then select “Device Manager” from the search results.
- In “Device Manager”, right-click your webcam and then select “Properties.”
- Switch to the “Driver” tab, select Uninstall > Delete the driver software for this device and then click “OK.”
- In “Device Manager”, select “Scan for hardware changes” from the “Action”menu, doing so will start scanning and reinstalling driver updates.

- Once drivers are installed, restart your PC and then try to open Camera app again.
- If issue still persists, you may contact webcam manufacturer to get the issue fixed.
Now read: How to remove your wallpaper and settings sync from your Microsoft Account on Windows 10


What other's say