How to change Recycle Bin storage settings on Windows 10 PC

Recycle bin is the important feature in windows 10 that stores all the deleted files from your computer hard disk. The files you deleted accidentally or you want any file back on your computer can be easily restored from recycle bin. Moreover, Recycle Bin will not save all your deleted files forever. Only 5-15 percent of space is reserved to store deletions. Once space fills up, Windows 10 starts erasing the oldest files to create space for new deletions. In Windows 10, you may adjust the settings to change the maximum storage size to increase the number of files you can restore, remove files bypassing the Recycle Bin and give confirmation dialog to stop accidental deletions. Let’s learn how to change these recycle bin storage settings on your Windows 10 PC.
To delete files immediately bypassing Recycle Bin
If you are working on files which are not important you may configure an option to remove files immediately, follow the below given steps to do that:
- Press “Windows + D” keyboard shortcut to view the desktop.
- Right click the Recycle Bin icon and click “Properties.”
- If there are multiple hard drives on your PC, select the Recycle Bin location that you want to configure.
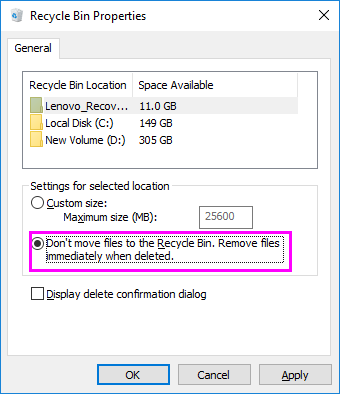
- Under the “Settings for selected location” section, select “Don’t move files to the Recycle Bin. Remove files immediately when deleted.”

- Click “Apply” and then click “OK.”
After configuring the above settings, files will skip recycle bin and remove immediately.
To adjust the maximum storage usage for Recycle Bin
You may easily increase and decrease the storage to keep deleted files, follow the below given steps to do that:
- Press “Windows + D” keyboard shortcut to view the desktop.
- Right-click the Recycle Bin icon and then click “Properties.”
- If there are multiple hard drives on your PC, select the Recycle Bin location that you want to configure.
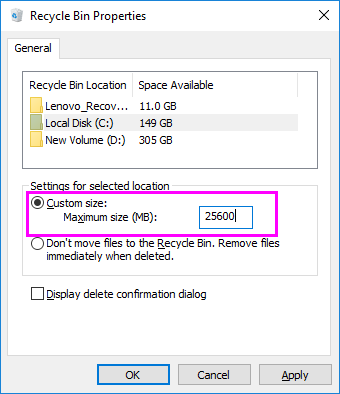
- Under the “Settings for selected location” section, click “Custom size.”
- In the “Maximum size (MB)” section, mention the maximum hard drive space in megabyte that Recycle Bin can use on the specific partition. For example, if you have a 200GB drive and you want Recycle Bin to use 25GB of space then you need to mention 25600 megabytes ( 1GB is equal to 1,024MB).

- Click “Apply” and then click “OK.”
After completing the above given steps, will be able to store files from a particular location as per your configuration.
To show a confirmation before deleting files on Windows 10
You may easily enable a confirmation dialog before moving a file to the Recycle Bin, follow the below given steps to do that:
- Press “Windows + D” keyboard shortcut to view the desktop.
- Right-click the Recycle Bin icon and then click “Properties.”
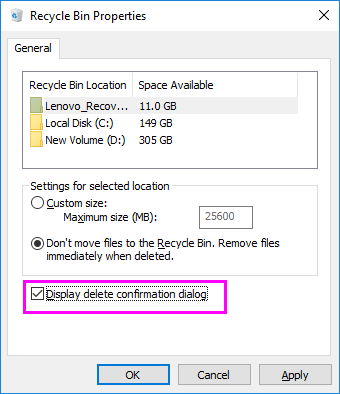
- Enable “Display delete confirmation dialog”

- Click “Apply” and then click “OK.”


What other's say