How to configure FTP server on your Windows 10 PC

Most of us use cloud storage to transfer files but cloud storage has some limitations and restrictions that may cause problem. To avoid it, you may create your FTP (File Transfer Protocol) server that is very convenient and easiest way to transfer files through private and public network without any limitations. You may easily transfer from small text file to a 1500GB PC backup and also create multiple accounts to allow your friends and family to access your data remotely. Here, we will provide you some easy steps to configure FTP server on your Windows 10 PC.
To install FTP server on Windows 10 PC
Like previous Windows versions, first you need to add some required components on your Windows 10. Follow the below given steps to install FTP server on your PC:
- Press “Windows key + X” keys to open the Power User menu and select “Programs and Features.”
- On the right side of window, click “Turn Windows features on or off.”

- Expand Internet Information Services and check the “FTP Server.”

- Expand FTP Server and check the “FTP Extensibility.”
- Then, enable “Web Management Tools” with the default selections.
- Click “OK” to start the installation and then click “Close.”
To configure FTP site on Windows 10 PC
Once FTP server components are installed, you need to configure FTP site, follow the below given steps to do that:
- Press “Windows key + X” keys to open the Power User menu and select “Control Panel.”
- Open “Administrative Tools” and then double-click “Internet Information Services (IIS) Manager.”
- On the left side Connections pane, expand and right-click “Sites” and then select “Add FTP Site.”

- Enter the name of your FTP site and the path to the FTP folder you want to use to send and receive files and click “Next.”

- On Binding and SSL Settings window, leave all the default settings but change the SSL option to “No SSL” and click “Next.”

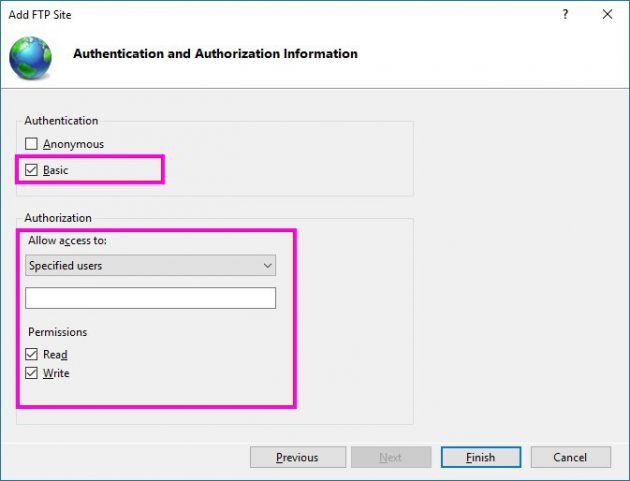
- Below “Authentication” section, check the “Basic” option.

- Below “Authorization” section, select “Specified users” from the drop-down menu.
- Enter the email address of your Windows 10 account or local account name to permit your access to the FTP server.
- Below “Permissions” section, check “Read” and “Write” options and click “Finish.”
To allow your FTP server through Windows Firewall
If firewall is enabled on your PC, it may restrict or block your connections. To allow access to your FTP server, you need to allow it through Windows firewall. Follow the below given steps to do that:
- In the start menu, type“Windows firewall” and hit “Enter.”
- In the left side pane“Allow an app or feature through Windows Firewall.”

- Click“Changes settings.”

- Select “FTP Server” and make sure to allow it on a “Private” and “Public” network and click “OK.”
This is how you may easily install and configure FTP server on your Windows 10 PC. Once FTP server is configured, you may use your favorite FTP client to connect your newly created FTP server from your private and local network.


What other's say