How to create a recovery partition on your Mac

Recovery partition is a built-in recovery system of your Mac that helps you to start your Mac in recovery mode and use its utilities to recover some software issues on your Mac. However, MacOS offers a built-in recovery partition that get created automatically during installation and stored in a hidden section of your Mac’s hard drive. With this recovery mode, you may recover a failed Mac by holding “Cmd + R” during startup of your system. But sometimes recovery partition does not created automatically. In such a case you need to create manually. Here, we will provide you some easy steps to create a recovery partition on your Mac.
You may easily create a recovery partition for your Mac by following the below given steps:
- Create a full backup of your Mac.
- In order to re download the installer file for the High Sierra MacOS , you need a removable drive of at least 8 GB free storage capacity.
- This removable drive must be formatted, if it is not then you may format it by following the below given steps:
- Go to Applications > Utilities and open Disk Utility.

- Select the drive and click “Erase.”
- Select “Mac OS Extended (Journaled)” as the format type and then click “Erase.”

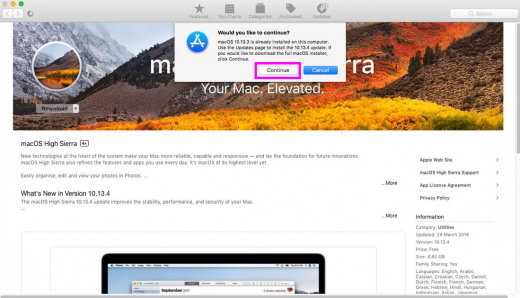
- After formatting your hard drive, go to Mac store and search for High Sierra and click Download.
- If your system already has OS X 10.13, you may get a warning message: “Would you like to continue?” click “Continue.”

- Type in your Apple ID and password when prompted. The installer is about 5GB, so downloading may take some time.
- After completing the download, the installer will launch automatically, but you need not to use it yet, so press “Cmd + Q” to close the installer.
- Locate the installer file in application folder and save it to an external flash drive.
- Next you need to create a bootable USB disk so that you may install a new copy of High Sierra on the Mac from the flash drive.
- In order to create bootable USB disk, connect the removable drive to your Mac and rename it if you want.
- Make sure that High Sierra installer is in its default location in your main Applications folder.
- Now , copy the below given text command:
sudo /Applications/Install\ macOS\ High\ Sierra.app/Contents/Resources/createinstallmedia –volume /Volumes/Untitled –applicationpath /Applications/Install\ macOS\ High\ Sierra.app –nointeraction
- Go to Applications > Utilities and double-click Terminal to launch it.
- Paste the copied text command into Terminal and hit “Enter.”

- Enter your admin password and hit “Enter” again.
- If you get the message “To continue we need to erase the disk at /Volumes/Untitled”. If you want to continue type (Y) then press enter, if not, then you will get “Copy complete and done message” (This process may take up to half an hour).
- After completing the above given steps, remove the USB or removable drive and keep it in safe place.
Now read: How to use Time Machine to back up and restore your Mac


What other's say