How to set up File Sharing to share files on your Mac

How to use File Sharing feature on your Mac?
File Sharing is one of the most requested features on Mac. With this feature, you may share files, documents and folders with other Macs connected your network. Additionally, you may share your entire Mac with everyone or allow specific users access to only selected folders or files. If you are using Mac and want to share file to your colleague whose system is connected to the same network, File Sharing is the easiest and quickest way to share files on the same network. Let’s learn how to set up File Sharing feature on your Mac.
You may easily configure the File Sharing to share files on your Mac by following the below given steps:
- On your Mac, select “System Preferences” from the Apple Menu.
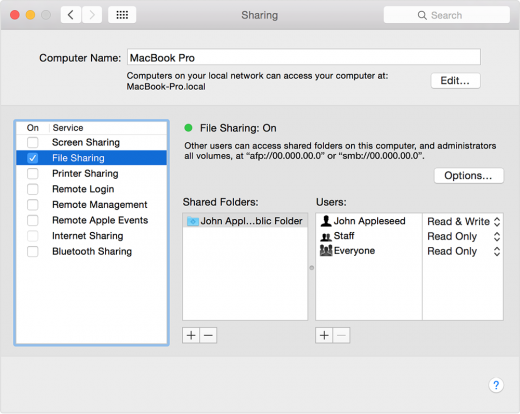
- Click on the “Sharing” and then check the box in front of “File Sharing.”
- At the bottom of the Shared Folders list, click on the “+” button, locate the folder that you want to share, select it and then click “Add.”

- The Public folder of each user with an account on your Mac is shared automatically. To stop a folder from being shared, add it in the Shared Folders list and then remove it by clicking on “–“ button.
- Control-click the name of the folder, click on the “Advanced Options” to select desired options and then click “OK.”
- A person with administrator account can access your entire Mac, if you want to allow access to specific users , select the folder in the Shared Folders list, click the “+” at the bottom of the Users list and then do one of the following:
- To add users or groups from all users of your Mac: Select Users & Groups in the list on the left pane, select one or more names in the list on the right pane and then click “Select.”
- To add users or groups from people on your network: Select Network Users or Network Groups in the list on the left pane, select one or more names in the list on the right pane and then click “Select.”
- To add person from your contacts and create a sharing -only account for them: Select Contacts in the list on the left pane, select a name in the list on the right pane, click “Select“, create a password and then click “Create Account.”
- To decide a limit of access to users, select the user in the Users list, click the triangles next to the username and then select one of the following:
Read & Write: It allows a user to see and copy files to and from the folder.
Read Only: It allows a user to view the contents of the folder but does not to copy files from it.
Write Only (Drop Box): It allows a user to copy files to the folder but does not to view its contents.
No Access: It does not allow user to see and copy files from the folder.
Now read: How to share files using AirDrop on your Mac


What other's say