How to disable webcam on your Windows 10 PC

How to disable or enable webcam on Windows 10?
If you have integrated camera on your Windows 10 PC or laptop, cyber hackers or spywares may use it silently to monitor your activities. With this growing technology, our lives are getting easier but it is also risky somewhere. Nowadays, hackers use Remote Access Technology to compromise your system and see you, monitor your activities and even record your actions, using your own webcam. Usually, you need a Webcam to connect with people over various platforms like Skype, Facebook and more. If you don’t want anyone to use your system webcam to monitor your activities, you may completely disable your camera without any special software. All you need to do is to just disable the device from the device manager. Here we will provide you some easy steps to disable webcam on Windows 10.
On your Windows 10 PC, you may easily disable webcam by following the below given steps:
- First of all, press the “Windows button+ R” to open the “Run window” on your Windows 10 PC.
- In the “Run Window” that appears, type “devmgmt.msc”and click “OK” to launch device manager.

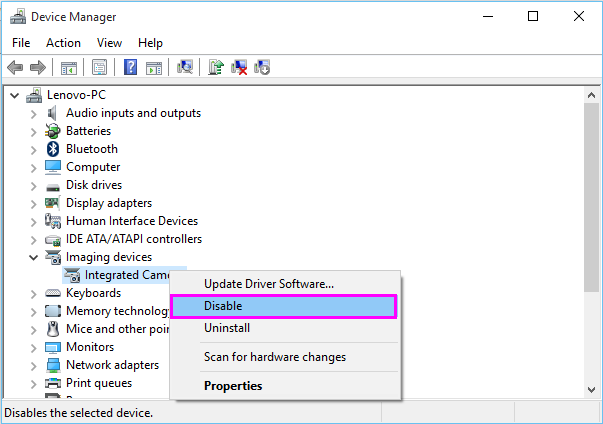
- Now, expand “Imaging devices”to show your camera. It may be listed as VGA WebCam, integrated Camera, USB Camera or something similar.
- Now, right click on the camera option and select the “Disable” option.

- Now, the camera is disabled and it will not be accessed by Windows and applications.
- If you want to re enable it, you may repeat the process and then select “Enable.”
This is how you may easily disable webcam on your Windows PC. By disabling your system webcam, you may prevent spywares from monitoring your activities. Plus, Windows and applications can not use it wihtout having your permissions.
Now read: What to do if webcam is not working on your Windows 10


What other's say