How to customize the Finder toolbar and sidebar on Mac
On your Mac, you may see a strip of icons across the top of the Finder window that is known as the toolbar. Finder windows also have a sidebar with items you frequently use, including folders, disks and tags. By default, the sidebar is divided into four sections which are Favorites, iCloud, locations and tags. Favorites include the items you use more frequently; iCloud includes items automatically stored in iCloud Drive, Locations show icons that represent your computer’s drives and Tags provide quick access to all the items using a specific tag. Here we will provide you several ways to customize the Finder toolbar and sidebar on your Mac.
How to customize the toolbar on your Mac?
By following the below given steps, you may easily customize the Toolbar on your Mac:
- On your Mac, click the Finder icon in the Dock to launch a Finder window.
- Now, do any of the following to customize the toolbar:
- To hide or show the toolbar: Select View > Hide Toolbar or View > Show Toolbar. When you hide the toolbar, it also hides the sidebar and moves the status bar from the bottom to the top of the window.
- To resize the toolbar: If angle brackets are there at the right end of the toolbar, it means the window does not have enough space to show all of the toolbar items. You may enlarge the window or click the brackets to see the rest of the items.
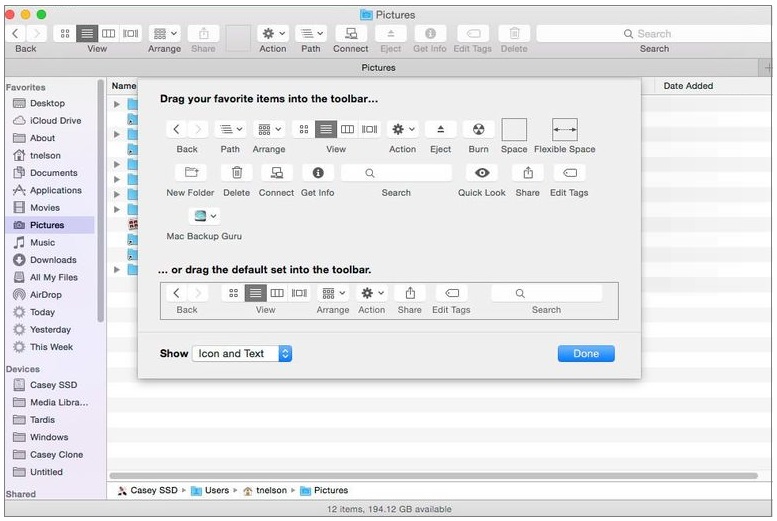
- To change what’s in the toolbar: Select View > Customize Toolbar. From here, you may drag items into and out of the toolbar, add a space between items and select whether to show text with the icons or not.
- To rearrange the items in the toolbar: If you want to change the item location, press and hold the Command key and then drag an item to a new location.
- To add a file or an app: Press and hold the Command key and then drag the item to the Finder toolbar until you see a green plus sign.
- To remove an item: If you want to remove any item, press and hold the Command key and then drag the item out of the toolbar.
How to customize the sidebar on your Mac?
If you want to customize the sidebar, follow the below given steps to do that:
- On your Mac, click the Finder icon in the Dock to launch a Finder window.
- Now, do any of the following to customize the sidebar:
- To hide or show the toolbar: Select View > Hide Sidebar or View > Show Sidebar.
- To resize the sidebar: You may resize the sidebar by dragging the right side of the divider bar to the right or left.
- To change what’s in the sidebar: Select Finder > Preferences, click “Sidebar” and then select or deselect items.
- To rearrange items in the sidebar: You may rearrange the item by simply dragging it to a new location.
- To show or hide all the items in a section of the sidebar: To show or hide the item, position the pointer over the section head until you see Hide or Show appear and then select the “Hide” or “Show” button.
- To add a folder or disk to the sidebar: You may drag the item to the Favorites section. If the Favorites section is not there, select Finder > Preferences > Sidebar and then select at least one item from the Favorites section. By adding an item to the Finder sidebar, you may only create a shortcut to the item. But item does not move from its original location.
- To add an app to the sidebar: If you want to add an app to the sidebar, press and hold the Command key and then drag the app icon to the Favorites section.
- Remove an item: If you want to remove any item, just drag the item’s icon out of the sidebar until you see the remove button.
This is how you may customize toolbar and sidebar on your Mac, as per your need.
Now read: How to sort items, group icons and resize columns in the Finder on Mac


What other's say