How to generate and view Wi-Fi history report in your Windows 10 PC

How to generate WLAN history report in WIndows 10?
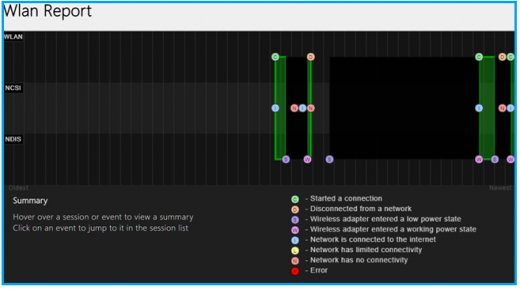
If you want to know how long your PC was connected to a Wi-Fi network over the past few days, you may generate and view a Wi-Fi or WLAN history report in your Windows 10 PC. Windows 10 has built in feature that allows you to create a history by using network name, duration of the sessions and timings. With this feature, your PC saves a lot of information whenever you connect it to a Wi-Fi network. It records information such as network name, connection start and end time, session duration and errors if you received any while trying to connect with the network. By running a command line tool, you may save the report as an HTML file on your PC. Here, we will provide you a step by step guide to do that:
You may easily generate and view Wi-Fi or WLAN history report in Windows 10 by following the below given steps:
- First of all, in the start menu, type “CMD”, right-click on “Command Prompt” entry in the search results, and then click “Run as administrator.”
- Select “Yes” button to open the Command Prompt window. Make sure you are using admin account, if not then login with the admin password.
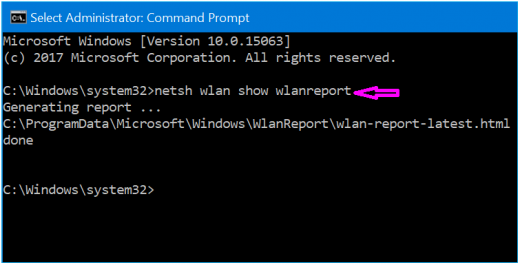
- In the Command Prompt appears, enter the below command then hit “Enter.”
netsh wlan show wlanreport

- After running this command, your system will generate Wi-Fi history report and save it in the below give location.
C:\ProgramData\Microsoft\Windows\WlanReport
- Now that you have the report, locate the above given folder in the File Explorer.
Note: The “ProgramData” folder is not visible by default so you need to click “View” and then click “Hidden items” to see it.
- Double-click on WLAN-report-latestfile and choose a web browser to open it to view the Wi-Fi history report in your web browser.

By Following the above given instructions you may easily generate and see the WLAN history stored on your Windows 10 PC.
Now read: How to fix common issues with applications on Windows 10


What other's say