How to fix wrong date and time on your Windows 10 PC

Sometimes Windows 10 could start showing wrong time and date on desktop. This issue can be caused due to couple of reasons such as incorrect time zone, wrongly set date and time, evacuated CMOS battery or more. If your Windows 10 PC is displaying wrong date and time, here we will provide you some easy solutions to address the issue.
In order to fix wrong date and time on your Windows 10 PC, follow the below given solutions to do that.
1. Set the right time zone
First of all, make sure that you selected the right time zone. If it is not then you may the right time zone by following the below given steps:
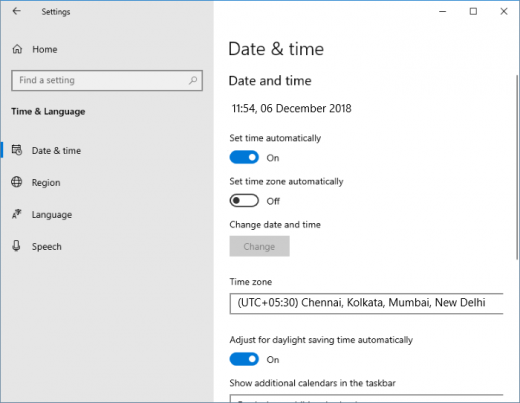
- On your windows 10 PC, go to Settings > Time & language> Date & time page.

- In the “Time zone”section, make sure that right time zone is selected. If it is not, select the correct one from the drop-down box.
- Moreover, if daylight saving time applies to your time zone, enable the “Adjust for daylight saving time automatically” option.
2. Disable and then re-enable Set time automatically
If your system is connected to internet, it allows you to set date and time automatically.
- On your Windows 10 PC, open the Settings app and go to Time & language> Date & time page.
- Disable “Set time automatically”option if it’s already enabled and then re enable it.
3. Check if Windows Time service is running
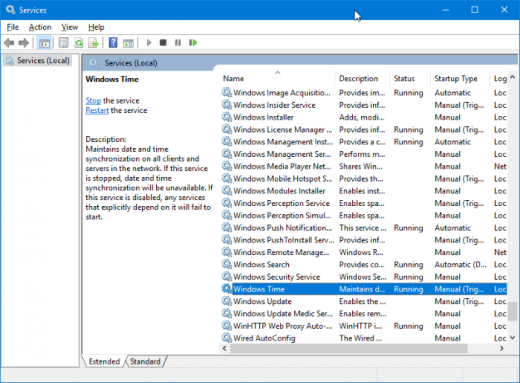
Windows 10 has a background service called Windows Time that syncs date and time. You may check if it is running or not by following the below given steps:
- On your Windows 10PC, in the start menu, type “services.msc” and then press the “Enter” key to open Services window.
- Locate the “Windows Time”service and then double-click on it to open its properties dialog.

- In the properties window, make sure that the startup type of the service is automatic and is running. If it is stopped, you may run it by clicking on the “Start.”
4. Manually configure Date and Time
Moreover, you may also set the Date and Time manually on your Windows 10 PC, follow the below given steps to do that.
- On your windows 10 PC, go to Settings > Time & language> Date & time
- Enable “Set time automatically.”
- In the “Change date and time” section, click the “Change.”
- Select the correct date and time and the click on the “Change” button to set the new date and time.
5. Check CMOS Battery
CMOS battery can also be the reason of incorrect date and time of your system. In order to fix it, you need to your PC’s manufacturer to know about the replacement of CMOS Battery.
Now read: How to enable “Night Light” filtering in your Windows 10 PC


What other's say