How to insert or remove columns in a document in Google Docs

Google Docs has smart editing and styling tools that help you to format text and paragraphs. You may use this web based software office suite offered by Google within its Google Drive service. With this application, you may also create and edit documents online while collaborating with other users in real-time. Now, Google Docs can also divide the document in columns. If you want to add or remove columns in a document in Google Docs, you may easily do it. Let’s learn how to do that.
How to make text into columns in Google Docs?
By following the below given steps you may insert columns in your document in Google Docs.
- Open a document in Google Docs on your computer.
- Now, select the text you want to put into columns.
- Click Format > Columns and then select the number columns you want to add in your document.
How to change column formatting in Google Docs?
If you want to change the column format, follow the below given steps:
- Open a document in Google Docs on your computer.
- Select the columns you want to modify.
- Click Format> Columns and then select “More options.”

- Click “Apply” to save your changes.
How to add column break and remove column in Google Docs?
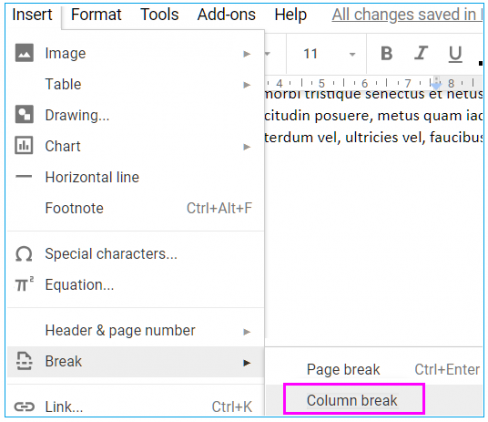
If you want to start typing in the next column, you need a column break. Follow the below given steps to add the column break:
- Open a document in Google Docs on your computer.
- Click the part of the column where you want to insert a break.
- Then, click Insert>Break > Column break.

- If you want to remove any column, select the columns you want to delete.
- Click Format> Columns > 1 column.
This is how you may easily add or remove columns in your in a document in Google Docs. This feature is excellent for making newsletters, pamphlets and brochures.
Now read: How to add, view, edit or delete comments in Google Docs


What other's say