How to Record Screen with VLC Media Player on Windows
How to record screen with VLC media player on Windows?
VLC media player is an excellent media player which is known for its best media supporting features. You may already have this application on your computer. VLC media player has a built-in recorder that can be used to record your computer screen on many versions of Windows. It is free, open source and perfect for instant video recording, which makes it easy to enjoy for anyone. Let’s learn how to record and capture the screen with VLC media player.
Follow the following steps to start recording your computer screen with VLC media player.
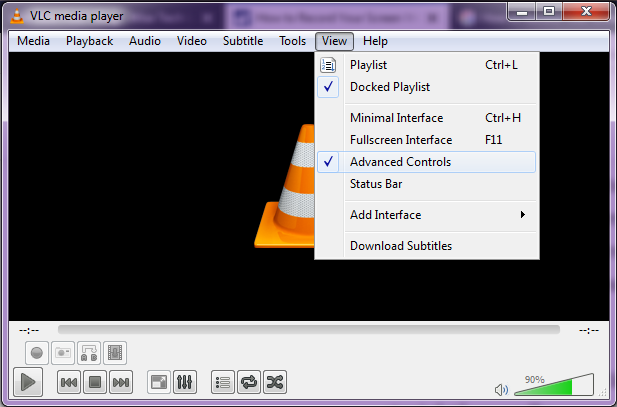
Step 1: Access VLC media player and use the “View” tab to select the “Advanced Controls” from the drop down list.
Step 2: Click “Media” on the top left corner of VLC media player and then click “Open capture device” to open media dialogue box.
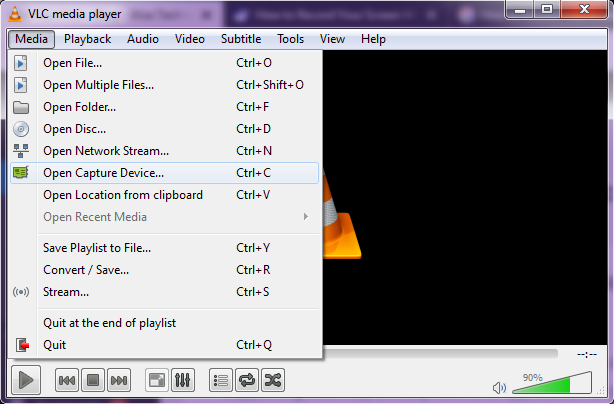
Note: You may directly access the media dialogue box on your screen by pressing Ctrl + C keys.
Step 3: From the “Media” dialog box, you need to click “Capture Device” to select a capture device.
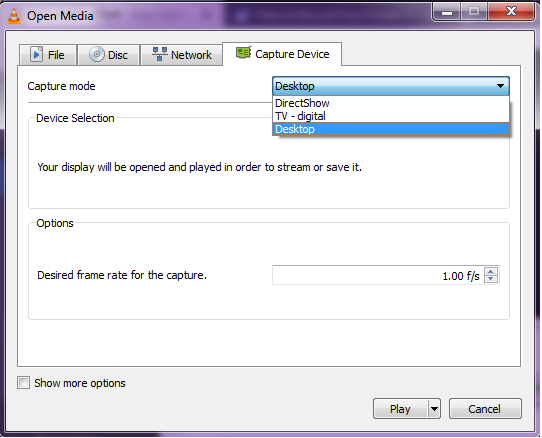
Step 4: Select “Desktop” as your ideal capture mode and then you can simply select “Desired frame rate for the capture”. The standard frame rate could be 25-30 frames per second and the standard frame rate for capture is 10 frames per second on many screen captures. You may also use high frame rate to get a smoother video but it consumes more processing power.
Step 5: Click on the tiny arrow facing in downwards direction and select the last second option “Stream”.
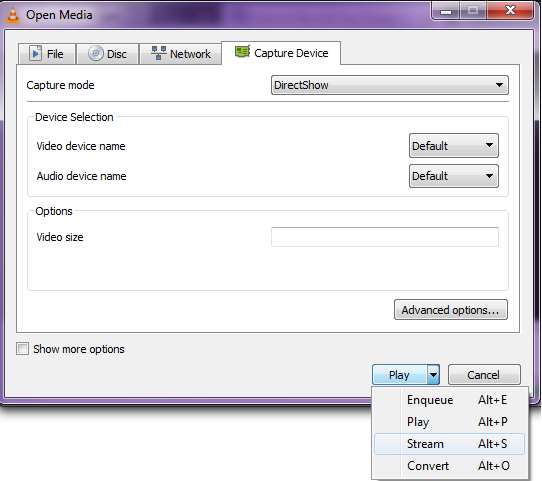
Step 6: Then, you will be prompted with a “Stream Output” window, click “Next”. There you can see “Destination Setup”; select “File” and “Add” beside “New Destination”.

Now, select the location where you want to store the file and you can rename it as per your choice.
Step 7: After completing above steps, click “Next”. You need to select the default format (default H264+ MP3/MP4 ), if you are unknown of video codecs and again click “Next”.

Step 8: VLC will start your computer screen recording the moment you click on “Stream“.

You may confirm that your Desktop screen is being recorded by seeing the timer and the progress. Moreover, you may pause the recording by clicking “Play” and also stop the recording by clicking “Stop” in Advanced Controls. Select the location where you want to save the recording. You may locate the file name to access them.
You may also capture screens with audio by selecting the audio format. Follow the following instructions to configure these settings.
Step 1: Open VLC Media player and Press CTRL + C to get “Open Media” dialog box opened on your screen.
Step 2: Click “Show more options” at the bottom-left corner of the “Open Media” dialog box.
Step 3: Mark the checkbox beside “Play another media synchronously (extra audio file)” to add the voice file.

With VLC media player , you may easily record your computer screen with audio and save them on your desired location of your computer.


What other's say