How to set a message expiration date in Outlook365

Microsoft Outlook is the most popular emailing platform used by officials. Outlook has many key features like setting message expiration date and more. With this feature, you may set an expiry date in the email that contains sensitive information. Once expiry date is set, recipients will not waste their time in responding after the deadline has passed. If you don’t want to waste your valuable time, you may set message expiration date. Here we will provide you some easy instructions to do that.
How to set expiration date in Outlook email?
By following the below given steps, you may easily set expiration date in Outlook.
- Open your Outlook account and click File > Options.
- In the “More Options” group, click the “Message Options” from the Dialog Box Launcher.

- Under “Delivery options”, check “Expires after”, and then select a date and time.

- Once the expiration date passes, message remains visible but gives a visual message that the message is out of date or not relevant.
How to set expiration date to all messages you send?
By following the below given steps, you may configure Outlook to automatically add expiration date to all the messages.
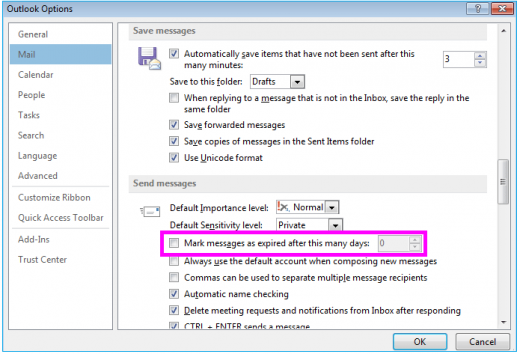
- Select File> Options and select “Mail” from the left side pane.
- Now, scroll down to “Send messages”, check the box “Mark messages as expired after this many days.”

- Enter a number of days between 1 and 99 and click “OK.”
How to set an expiration date for a message you receive?
Moreover, you may also set the expiration date on your Mac by following the below given steps.
- As you are not able an expiration date from the Reading Pane, so select
- File > Properties.
- Under “Delivery Options” section, check the box in front of “Expires after”, select a date and time for your message to expire and then click “Close.”
- After completing it, click the “Save” button in the top left corner of your message to set the expiration date.
This is how you may set message expiration date. Moreover, you may delete the expired messages by selecting them and clicking “Delete” on the ribbon or pressing the “Delete” key on the keyboard.
Now read: How to delay or schedule delivery of emails in Outlook 365 on your Mac


What other's say